Hi folks, another little tutorial that I thought might be useful to some.
While I was working on my Golden Throne diorama I wanted to make some candles for the piece, but I couldn't find exactly what I was after when looking around for tutorials.
I wanted my candles to have that translucent waxy look of real candles and after sleeping on it I woke with an idea and these were what I came up with:
This actually looks a lot more complicated than it really is due to taking pictures for a step-by-step, but bear with me.
Making the candles:
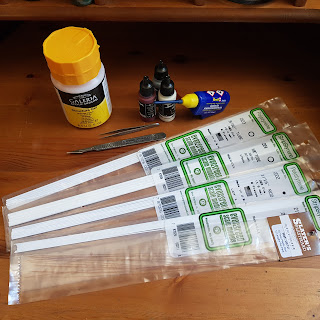
They're mostly just made up of various sizes of styrene rod/tubing. I had a selection from a local model rail shop, they also had a pack of really thin "thready" styrene that i picked up on a whim in case it came in useful... Guess it did.
The other main components are tools for cutting/handling. Structure gel, plastic glue and paint.
I just haphazardly cut sections of a few different sized rods and tubes since I was going for a used look to my candles. you can measure and cut them neatly if you wish or are going for a "new" candle look.
You can just about see the thin thread-like styrene in the picture below just under my cut pieces.
I used an upturned base to store and keep safe my styrene bits while I worked.
Same goes for the really thin thready styrene, this was particularly easy to lose on the desktop. this will be used as the candle-wick, I'd say cut it a little longer than you want so it can be trimmed later.
Construction is simple, it's all plastic, so quickly goes together with some liquid poly-cement.
You can see below how I tried to emulate a cluster of old candles. some rods as candles alone. some tubes with a bit of rod inside to make a dip in the middle. And some angular little bits around the edges to simulate old melted candles.
The thin plastic thread was attached using a dot of glue and a pair of tweezers to get it in the right spot for a wick.
Once they had cured I trimmed near to the required length the wicks down a little with a pair of clippers.
And you should be left with some rough looking candle shapes like below.
Using a wooden cocktail stick to grab a small dot of plastic glue
Just touch this tiny amount of glue to the very tips of the candle-wicks.
When this cures/dries it gives the candle-wicks that frayed burned look, which we will push further at a later stage. So this step is optional if you want to go for a new candle look.
The next stage will need two things, the structure gel and your colour of choice.
You can paint the candles in place on your miniature or terrain. I found it easier to paint the ones I was making for the Throne diorama separately, stuck on the end of some cocktail sticks and then glued them down after they dried.
I didn't even prime them as they are so small and would be coated with the gel later. So just give them a good clean coat of your chosen colour wicks and all, I went with an ivory here.
I didn't even prime them as they are so small and would be coated with the gel later. So just give them a good clean coat of your chosen colour wicks and all, I went with an ivory here.
I love structure gel, I've found lots of uses for it in my hobby work. It looks white in the pot but it dries completely clear.
I took a thick blob of gel and mixed a tiny dot of my original colour into it, you'll have no problem here as the gel is an acrylic base.
Paint a thin coat over the whole candles, it doesn't take a lot for this to work. You can then use the gel mix for it's intended purpose, to apply structure!
It's a really simple matter to build up the rim of the candles, model rivulets of old wax and also blob it around the base of the candles for old run-off wax.
It's a really simple matter to build up the rim of the candles, model rivulets of old wax and also blob it around the base of the candles for old run-off wax.
 |
this is the step to take the candle-wicks that little bit further... Or not, depending on what you're after. You could simply paint them black and leave it at that, or leave them unpainted for your new candle look.
I went a bit further. A little Agrax Earthshade (any brown ink/wash would probably do) and a little touch of black pigment powder mixed in.
I went a bit further. A little Agrax Earthshade (any brown ink/wash would probably do) and a little touch of black pigment powder mixed in.
This gives you that matte, dusty burned look on the candle-wicks which I think plays off of the glossy, waxy candles really nicely.
It's a pretty simple matter to whip up a batch of them lightly glued to some scrap styrene for later projects too.
I think that experiment really paid off. I wanted a more realistic looking miniature candle and these were more or less how I was imagining them.
Well I hope my little tutorial comes in handy for somebody for your miniatures, conversions and terrain making projects.
Take care.
Well I hope my little tutorial comes in handy for somebody for your miniatures, conversions and terrain making projects.
Take care.


0 Yorumlar